If you’re looking for a dessert that feels indulgent but still supports your nutrition goals, these high-protein cheesecake jars are a great option. They’re creamy, lightly sweet, and require no baking at all. Even better, they come together quickly with simple ingredients you likely already have at home.
This recipe is ideal for busy days when you want something satisfying without spending too much time in the kitchen. Whether you enjoy them as a dessert, snack, or even a quick breakfast, these cheesecake jars deliver a balanced mix of flavor and protein in every spoonful.
Why You’ll Love This Recipe
These cheesecake jars are designed to be easy, flexible, and nutritious:
- High in protein – Each serving provides a generous protein boost thanks to cottage cheese and Greek yogurt
- No baking required – Perfect for warm days or when you want a quick treat
- Simple ingredients – Only a handful of everyday items are needed
- Customizable – Easily adjust sweetness, toppings, or texture to suit your preferences
- Great for meal prep – Make ahead and store for a few days
Ingredients
- 2 cups cottage cheese (preferably 2% for balance of flavor and lightness)
- 3 cups plain Greek yogurt (full-fat for best texture, but any works)
- 4 tablespoons maple syrup (adjust to taste)
- 2 cups crushed graham crackers
- 1 cup fresh or frozen berries (strawberries, blueberries, raspberries, or mixed)
Optional Add-Ins
To enhance flavor or texture, consider adding:
- 1 teaspoon vanilla extract
- A little lemon zest for a classic cheesecake taste
- A pinch of salt to balance sweetness
- Chopped nuts or seeds for extra crunch
Equipment Needed
- Food processor or blender
- Mixing bowl
- Spatula or spoon
- Small jars, glasses, or cups for serving
Step-by-Step Instructions
1. Blend the Cottage Cheese
Add the cottage cheese to a food processor or blender. Blend for about 1–2 minutes until it becomes completely smooth and creamy. This step is important for achieving a cheesecake-like texture.
2. Add Sweetener
Pour in the maple syrup and blend again briefly until well combined. Taste and adjust sweetness if needed.
3. Combine with Yogurt
Transfer the blended cottage cheese to a mixing bowl. Add the Greek yogurt and gently fold the mixture together until smooth and thick.
4. Prepare the Base
Crush the graham crackers into fine crumbs. You can do this using a rolling pin, food processor, or by hand.
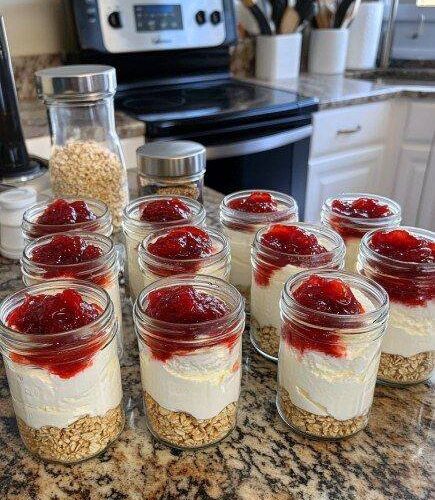
5. Assemble the Jars
Start layering your jars:
- First layer: graham cracker crumbs
- Second layer: cheesecake mixture
- Repeat layers as desired
Leave a little space at the top for toppings.
6. Add Toppings
Finish with a layer of berries. You can also add extra toppings like nuts, seeds, or a drizzle of honey.
7. Chill or Serve
You can enjoy the jars immediately, but chilling them for 1–2 hours improves the texture and flavor. For best results, refrigerate before serving.
Tips for Best Results
- For thicker texture: Chill overnight or add a small amount of cream cheese
- For less sweetness: Reduce maple syrup or use a natural low-calorie sweetener
- For crunch: Add graham crackers just before serving if storing overnight
- For smooth consistency: Blend cottage cheese thoroughly
Variations
Chocolate Cheesecake Jars
Add 1–2 tablespoons cocoa powder and a little extra sweetener.
Peanut Butter Version
Swirl in a tablespoon of peanut butter between layers.
Tropical Style
Top with mango, pineapple, and coconut flakes for a fresh twist.
Low-Sugar Option
Use a sugar-free sweetener and reduce or skip the graham crackers.
Dairy-Free Alternative
Substitute plant-based yogurt and dairy-free cottage cheese alternatives.
Storage
Store the jars covered in the refrigerator for up to 3 days. If making ahead, consider keeping the graham crackers separate to maintain their crunch.
Nutritional Estimate (Per Serving)
- Calories: حوالي 450 kcal
- Protein: ~30g
- Carbohydrates: ~60g
- Fat: ~10g
Values may vary depending on ingredients used.
Final Thoughts
These high-protein cheesecake jars are a great example of how simple ingredients can create something both nourishing and enjoyable. They strike a balance between dessert and healthy snack, making them suitable for a wide range of lifestyles.
With minimal prep time and plenty of room for customization, this recipe is one you can return to again and again. Whether you keep it classic or experiment with flavors, it’s an easy way to enjoy a creamy, satisfying treat without the need for baking.
