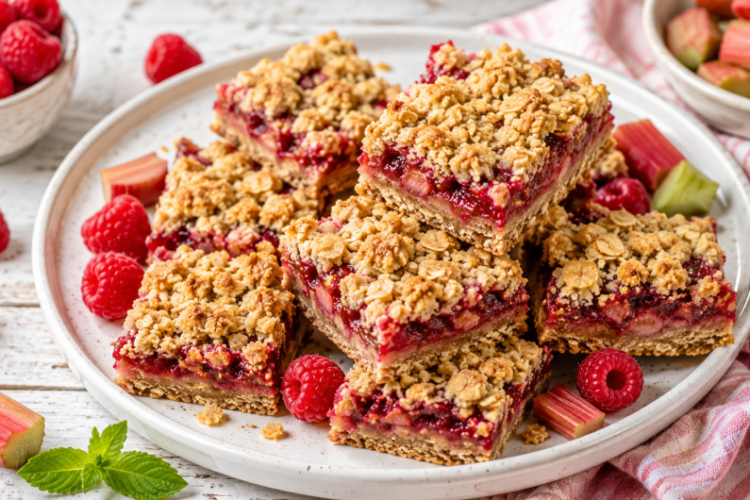
Gluten-Free Raspberry Rhubarb Crumble Bars combine a buttery oat crust, bright raspberry rhubarb filling, and a golden crumble topping in one simple dessert. The fruit layer is sweet and tart, while the oat mixture adds a soft, crisp texture. These homemade fruit bars are a good choice for afternoon snacks, brunch, family gatherings, and seasonal baking.
Why These Gluten-Free Fruit Bars Work
These raspberry rhubarb bars are made with gluten-free old-fashioned oats and oat flour, creating a hearty base without traditional wheat flour. The same oat mixture is used for both the crust and topping, which keeps the preparation straightforward. A cooked fruit compote sits between the layers, giving every square a juicy center and a pleasantly crisp top.
Raspberry and Rhubarb Flavor
Raspberries and rhubarb make a natural pairing because their flavors balance one another. Rhubarb brings a sharp, tangy taste, while raspberries add sweetness and a deep berry flavor. Cooking them together with raw cane sugar, lemon zest, and lemon juice creates a bright fruit filling that works especially well with the buttery oat crumble.
The Gluten-Free Oat Base
The crust begins with gluten-free old-fashioned oats and oat flour. Brown sugar adds a mild caramel flavor, while cinnamon gives the mixture gentle warmth. Tapioca starch or cornstarch helps improve the texture, and baking powder keeps the oat mixture from becoming overly heavy. Fine salt balances the sweetness and brings the other flavors together.
Choosing the Right Oats
Use gluten-free old-fashioned oats when making this recipe. Certified gluten-free oats are especially useful when preparing the bars for someone who needs to avoid gluten. Oat flour provides a finer texture than rolled oats, allowing the crust to hold together more easily. Using both ingredients gives the bars a pleasant combination of softness and chewiness.
Making the Raspberry Rhubarb Compote
The fruit filling is prepared before the bars are assembled. Combine diced rhubarb, raspberries, raw cane sugar, lemon zest, and lemon juice in a heavy-bottomed saucepan. Cook the mixture over medium heat until it reaches a strong boil, then reduce the heat and simmer for 10 minutes while stirring.
Thickening the Fruit Filling
After the fruit has cooked, add the cornstarch or tapioca starch and stir until it dissolves. Continue cooking for another three minutes, allowing the compote to thicken slightly. Stir in the vanilla extract after removing the pan from the heat. Let the filling cool for about 15 minutes before using it on the crust.
Why the Compote Needs to Thicken
A thick fruit filling is important because the bars need to hold together after chilling and slicing. If the fruit mixture is too loose, excess moisture can soften the oat crust. Cooking the compote with starch gives the raspberry rhubarb mixture enough body to sit neatly between the crust and crumble topping.
Preparing the Oat Crumble
While the fruit mixture cools, prepare the oat mixture. Whisk together the oat flour, gluten-free oats, brown sugar, tapioca starch, baking powder, salt, and cinnamon in a large bowl. Add the melted butter and stir until the mixture is evenly coated and no visible white streaks remain.
Building the Bottom Crust
Line an 8-inch square baking pan with parchment paper. Take a heaping cup of the oat mixture and press it firmly into the bottom of the pan. The back of a spoon or spatula works well for creating an even layer. Pressing the mixture firmly gives the finished bars a stable base that is easier to slice.
Pre-Baking the Crust
Prick the crust several times with a fork before placing the pan in the oven. Bake it at 350°F for about 12 minutes, or until fragrant and lightly browned. Remove the pan and let the crust cool for approximately 10 minutes. This short pre-bake gives the base enough structure to support the fruit filling.
Adding the Raspberry Rhubarb Layer
Spread 1¼ cups of the cooled raspberry rhubarb compote over the partially baked oat crust. Spread it gently so the fruit reaches across the surface without disturbing the crust underneath. The filling should form an even layer, giving each finished bar a balanced amount of fruit.
Creating the Crumble Topping
Once the fruit layer is in place, scatter the remaining oat mixture over the top. Do not press it down into the compote. Leaving the mixture loose creates the crumbly texture that makes these bars different from a standard fruit square. The buttered oats become golden and lightly crisp as they bake.
Baking the Crumble Bars
Return the assembled pan to the oven and bake for another 25 to 30 minutes. The topping should become browned and fragrant when the bars are ready. Since ovens vary, begin watching the topping toward the end of the baking time. A golden surface is a better visual guide than relying on the clock alone.
Why Cooling Matters
Allow the baked bars to cool before refrigerating them. The fruit filling continues to firm as it cools, while the oat crust becomes more stable. Cutting the bars while they are still warm can cause the filling to spread and the crust to break. Giving them time to set results in cleaner, sturdier squares.
Chilling for Better Slices
Refrigerating the bars is an important part of the recipe. Once chilled, the fruit filling becomes firm enough to hold its place between the oat layers. The cool temperature also improves the texture of the buttery crumble. For the cleanest slices, chill the bars thoroughly before cutting them into individual portions.
Fresh or Frozen Fruit
Both fresh and frozen rhubarb can be used for these gluten-free crumble bars. Fresh raspberries and frozen raspberries also work well. This flexibility means the recipe can be made when fresh rhubarb is in season or prepared later using frozen fruit. The cooking process allows the berries and rhubarb to soften and form a cohesive filling.
Using Tapioca Starch or Cornstarch
The recipe allows tapioca starch or cornstarch in both the oat mixture and fruit compote. These starches help improve the structure of the bars and thicken the fruit juices. Measure the starch carefully rather than adding extra, since too much can make the filling overly thick or change the texture of the crust.
Butter or Vegan Butter
The recipe uses melted butter in the oat mixture, and vegan butter can also be used. Butter gives the bars a rich flavor and helps the oat mixture become crisp during baking. If using vegan butter, choose a product that works well for baking. Keeping the quantity the same preserves the intended texture of the crust and topping.
Simple Gluten-Free Baking
One advantage of these bars is that they do not require complicated baking techniques. The fruit is cooked on the stovetop, the oat mixture is stirred together in one bowl, and the crust and topping use the same mixture. After the short pre-bake, the compote and remaining crumble are added before the final bake.
Serving Gluten-Free Crumble Bars
These fruit crumble bars can be served chilled, at room temperature, or gently warmed. They pair naturally with coffee, tea, or a cold glass of milk. For dessert, a warm square can be served with vanilla ice cream or another favorite topping. Their sweet-tart flavor also makes them suitable for brunch and afternoon gatherings.
A Good Make-Ahead Dessert
These raspberry rhubarb bars are convenient when you need dessert in advance. The recipe can be prepared, baked, cooled, refrigerated, and sliced before guests arrive. Chilling improves the texture rather than hurting it, so making the bars ahead can actually make serving easier. The firm squares are also simple to arrange on a serving platter.
Storage and Freezing
Keep the cooled bars refrigerated in an airtight container. Chilling helps maintain the structure of the fruit filling and oat layers. For longer storage, the bars can be frozen. Wrap individual portions or place them in a freezer-safe container with suitable separation to prevent them from sticking together.
Getting Cleaner Cuts
For neat squares, make sure the bars are fully chilled before cutting. Use a sharp knife and wipe the blade between cuts if necessary. Lifting the bars from the parchment before slicing can also make the process easier. Clean cuts reveal the contrast between the golden oat crumble and vivid raspberry rhubarb center.
Keeping the Crust Firm
The bottom crust should be pressed firmly into the pan before baking. An even, compact layer provides a stronger foundation for the juicy fruit filling. Avoid making the crust excessively thick in the center or thin around the edges. Consistent pressure helps the bars bake evenly and makes the finished squares easier to handle.
Avoiding a Soggy Bottom
The brief pre-bake is an important step for preventing a soft crust. Allowing the crust to cool for about 10 minutes before adding the compote also gives it time to firm. The fruit filling should be thickened properly before spreading. These small details help the oat base stay sturdy beneath the moist fruit layer.
Getting a Crisp Crumble
The topping should be scattered loosely across the fruit instead of being packed down. Loose pieces create more surface area for browning and produce the characteristic crumble texture. As the butter heats in the oven, the oat mixture becomes golden and crisp. The result is a pleasant contrast with the soft fruit filling.
Balancing Sweet and Tart Flavors
The raw cane sugar sweetens the raspberries and rhubarb, while lemon juice and zest keep the fruit flavor bright. Rhubarb naturally has a tart character, so the sugar helps soften its sharpness without completely removing it. Vanilla adds a gentle background flavor that rounds out the compote.
A Useful Gluten-Free Dessert
These bars are a practical choice when you want a gluten-free dessert made from familiar ingredients. Oats and oat flour form the main structure, while raspberries and rhubarb provide the fruit layer. There is no need for a complicated gluten-free flour blend. The straightforward method makes this recipe approachable for both experienced and beginner home bakers.

Gluten-Free Raspberry Rhubarb Crumble Bars
These Gluten-Free Raspberry Rhubarb Crumble Bars feature a buttery oat crust, a vibrant homemade raspberry rhubarb filling, and a crisp golden oat crumble topping. They offer the perfect balance of sweet and tart flavors, making them an excellent dessert, afternoon snack, or treat for spring and summer gatherings.
14
servings20
minutes45
minutes210
kcal25
1
hour30
minutesIngredients
- For the Oat Crumble Base and Topping
¾ cup gluten-free old-fashioned oats (80 g)
1 cup oat flour (100 g)
½ cup lightly packed brown sugar
1½ tablespoons tapioca starch (or cornstarch)
1¼ teaspoons baking powder
¼ teaspoon fine salt
¼ teaspoon ground cinnamon
½ cup melted butter (vegan butter may also be used)
- For the Raspberry Rhubarb Filling
2 cups diced rhubarb (fresh or frozen) (225 g)
1¼ cups organic raspberries (fresh or frozen) (170 g)
⅓ cup plus 1 tablespoon raw cane sugar
Zest and juice of 1 lemon
3 teaspoons cornstarch or tapioca starch
½ teaspoon vanilla extract
Directions
- Add the diced rhubarb, raspberries, raw cane sugar, lemon zest, and lemon juice to a heavy-bottomed saucepan. Cook over medium heat, stirring occasionally, until the mixture reaches a gentle boil. Reduce the heat and simmer for about 10 minutes, or until the fruit softens. Stir in the cornstarch or tapioca starch until completely dissolved, then continue cooking for another 3 minutes until the filling thickens slightly. Remove from the heat, stir in the vanilla extract, and let it cool for about 15 minutes.
- Preheat the oven to 350°F (175°C) and line an 8×8-inch baking pan with parchment paper. In a large mixing bowl, combine the oat flour, gluten-free oats, brown sugar, tapioca starch, baking powder, salt, and cinnamon. Pour in the melted butter and mix until all the dry ingredients are evenly coated and the mixture becomes crumbly.
- Set aside about one heaping cup of the oat mixture for the topping. Firmly press the remaining mixture into the prepared baking pan, using the back of a spoon or spatula to create an even crust. Prick the surface several times with a fork, then bake for 12 minutes, or until lightly golden and fragrant. Remove from the oven and let the crust cool for about 10 minutes.
- Spread 1¼ cups of the prepared raspberry rhubarb filling evenly over the cooled crust. Sprinkle the remaining oat crumble mixture across the fruit layer, keeping the topping loose rather than pressing it down. This helps the crumble become golden and crisp during the second round of baking.
- Return the assembled pan to the oven and bake for 25–30 minutes, or until the crumble topping is golden brown and lightly crisp. Keep an eye on the topping toward the end of the baking time to prevent excessive browning.
- Remove the baked bars from the oven and allow them to cool completely at room temperature. Once cooled, refrigerate them until fully chilled and firm, which helps the fruit filling set and makes slicing easier. Cut the chilled dessert into 14 bars and serve.
Nutrition Facts
- Serving Size: 14 g
- Total number of serves: 1
- Calories: 210kcal
- Fat: 8g
- Saturated Fat: 5g
- Carbohydrates: 31g
- Fiber: 3g
- Sugar: 16g
- Protein: 3g

